Apply equalization
If the audio system has separately adjustable speakers, such as a subwoofer, ensure that levels have been matched, crossovers are selected and speakers are time aligned.
HouseCurve supports automatic and manual equalization:
-
Automatic equalization - HouseCurve generates a filter that corrects a saved measurement to a target curve. HouseCurve supports PEQ (biquad) or FIR filters. The filter parameters can be exported to a file and loaded into your audio system (ex: parametric equalizer, convolution engine, etc). Even if you can’t import the filters - you can see what HouseCurve would adjust and use that as a guide.
-
Manual equalization - HouseCurve is used to guide manual tuning. This is the most straight forward approach. It works by iteratively measuring the audio system, adjusting it, then measuring again. It will work with any audio system, even ones with limited adjustments (ex: you can move furniture and see the impact).
What is equalization / room correction?
Equalization means adjusting an audio system’s output so that the response measured in the listening area aligns with a target curve. It is used to correct for characteristics of the audio system, or for the effects of the room (aka “room correction”). Since it is normally difficult to separate audio system from room, we are usually correcting for both at the same time.
When sound leaves an audio system, it interacts with the room, but this interaction changes with frequency. Below the Schroeder frequency, or about 300 Hz, room resonances have a dominant impact on what is heard in the listening area. At these frequencies, the room is in control. Above the Schroeder frequency, direct sound from the audio system begins to dominate with contributions from room diffusion, absorption and reflection. In this region, the audio system is mostly in control. Thus, when equalizing a typical home or car audio system, we are correcting for the room below the Schroeder frequency and for the audio system above it. For more information, read Floyd Toole’s paper).
When applying equalization, it is best to start at the low frequencies and work your way up. At low frequencies, room resonances will create large peaks and dips in the magnitude. The peaks and wide dips will be audible, so focus on smoothing them out to the target curve. Moving toward higher frequencies, peaks and dips become much less audible and should not be adjusted. Instead, shift your focus to adjusting wide regions of the magnitude response towards the target curve (an octave or more). At the very upper end (10 KHz), it may not be worth making any adjustments at all. A great video on the topic is here).
Gain management
Equalization adjusts the audio system gain at different frequencies through “boosts” and “cuts”. In order to avoid pushing your audio system too hard and causing distortion, please follow these recommendations:
-
Equalize the average of several measurements in the listening area - A single measurement will have narrow deep dips caused by standing waves known as room modes. The dip is measured when the microphone is in a location where a standing wave has an antinode. Boosting the dip has no effect at this location, but it will elsewhere in the room, leading to boomy sound and possibly distortion. Since the dips are location dependent, averaging helps to hide them, providing a better measurement of the “average experience” in the listening area.
-
Lower the target curve - To avoid increasing the overall gain, you can manually lower the target curve (see: target curve fit). This will cause more of the measurement to appear above the target curve, effectively increasing the number and size of cuts needed to correct. The result is lower overall system gain.
-
Use only cuts - You can also disable boosts altogether (see: allow only cuts). It is best to also lower the target curve a few decibels to get a better correction. Keep in mind that the peaks are more audible than the dips. avoid lowering the target curve to the bottom of the deepest dip. Doing so may lead to increased noise (you’ll have to increase the system volume to compensate for large cuts).
-
Avoid correcting beyond the capabilities of the system - A small bookshelf speaker may have a low frequency limit of 50 Hz (-6 dB). Applying a +10 dB boost at 30 Hz to get more bass is going to drive the speaker beyond its capabilities and lead to distortion (and possibly damage). When Coherence Blanking is enabled, the low frequency capability of the speaker is more obvious. If the speaker can’t produce 30 Hz, this portion of the measurement will not be displayed.
Automatic Equalization
HouseCurve’s Equalize Tool generates a filter to correct a saved measurement to a target curve.
For best results, average several measurements from the listening area and then save. Averaging provides HouseCurve with a better picture of how sound changes in the listening area.
The image below shows a saved measurement (grey) being corrected to the target curve (yellow). The filter that performs the correction is shown in magenta. The predicted magnitude response (when filter is applied) is shown in cyan.
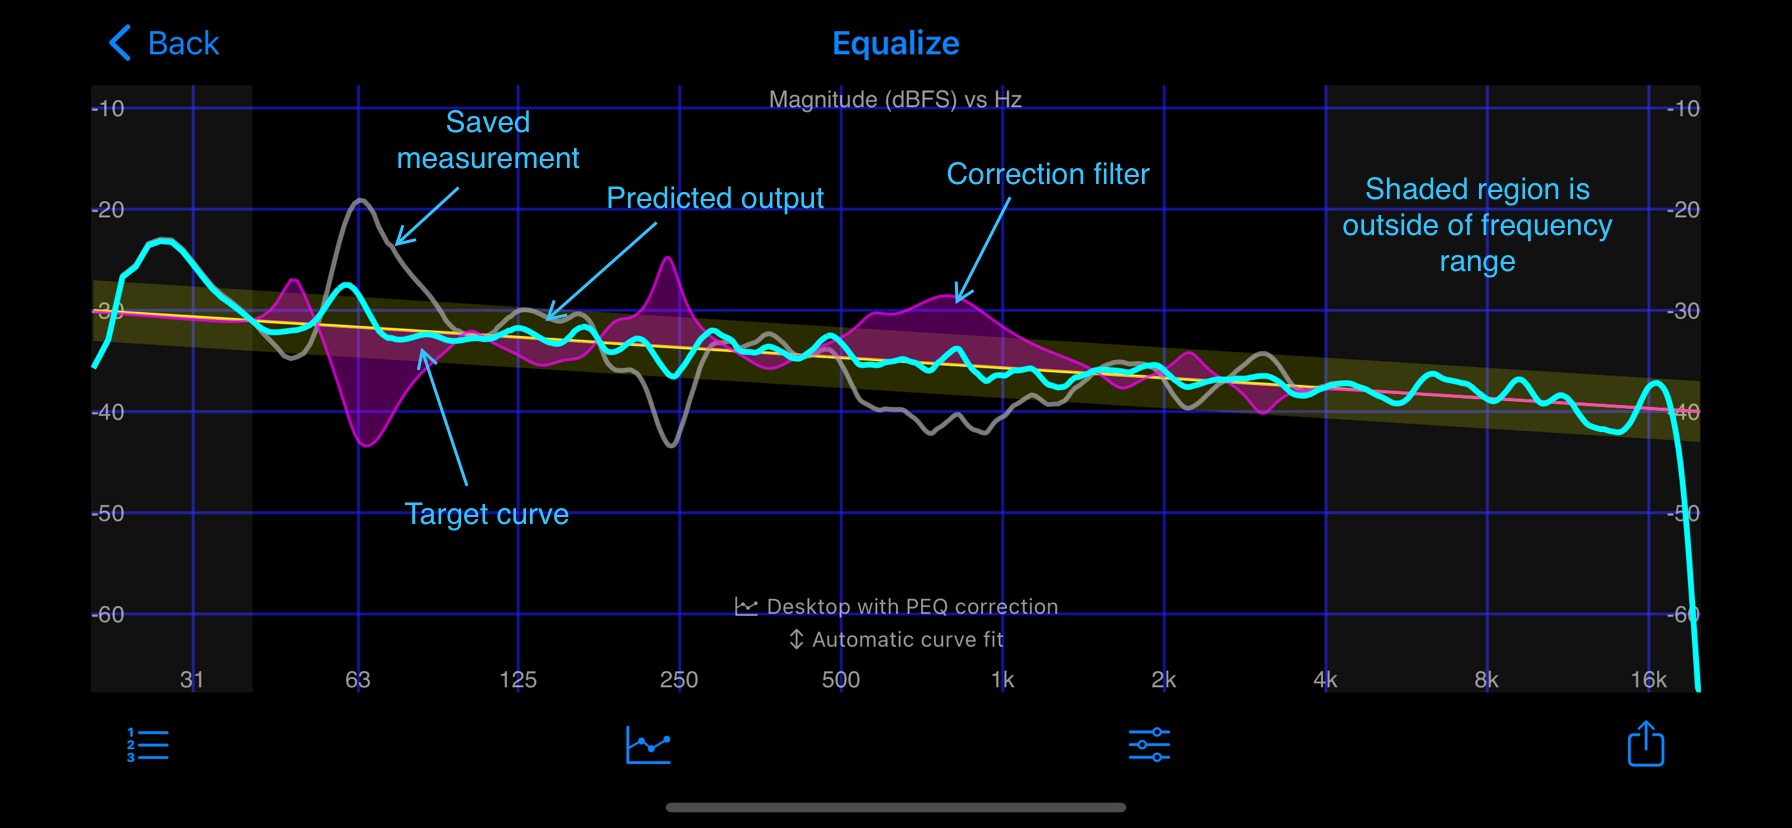
HouseCurve generates a filter by focusing on regions with the largest deviation from the target curve, starting with lower frequencies and ignoring blanked regions (see Coherence Blanking). The algorithm’s behavior can be controlled by tapping  to display the equalize setup screen. Plot settings, such target curve fit and blanking threshold also impact the algorithm. The display automatically updates to reflect any setting change.
The filter produced by HouseCurve is controlled by the filter type setting. FIR is higher fidelity than PEQ, but requires an audio system with a convolution engine (ex: Roon, Volumio, etc). PEQ requires a parametric equalizer. Note - if your audio system has a graphic equalizer (GEQ) it lacks the precision required for automatic equalization, try manual equalization instead.
The maximum boost applied by the filter is displayed in the equalize status. This value can be used to adjust the overall system gain to avoid clipping. If the maximum boost exceeds the maximum gain setting, then it will be displayed in red (PEQ only, usually happens when trying to correct beyond the capabilies of the system).
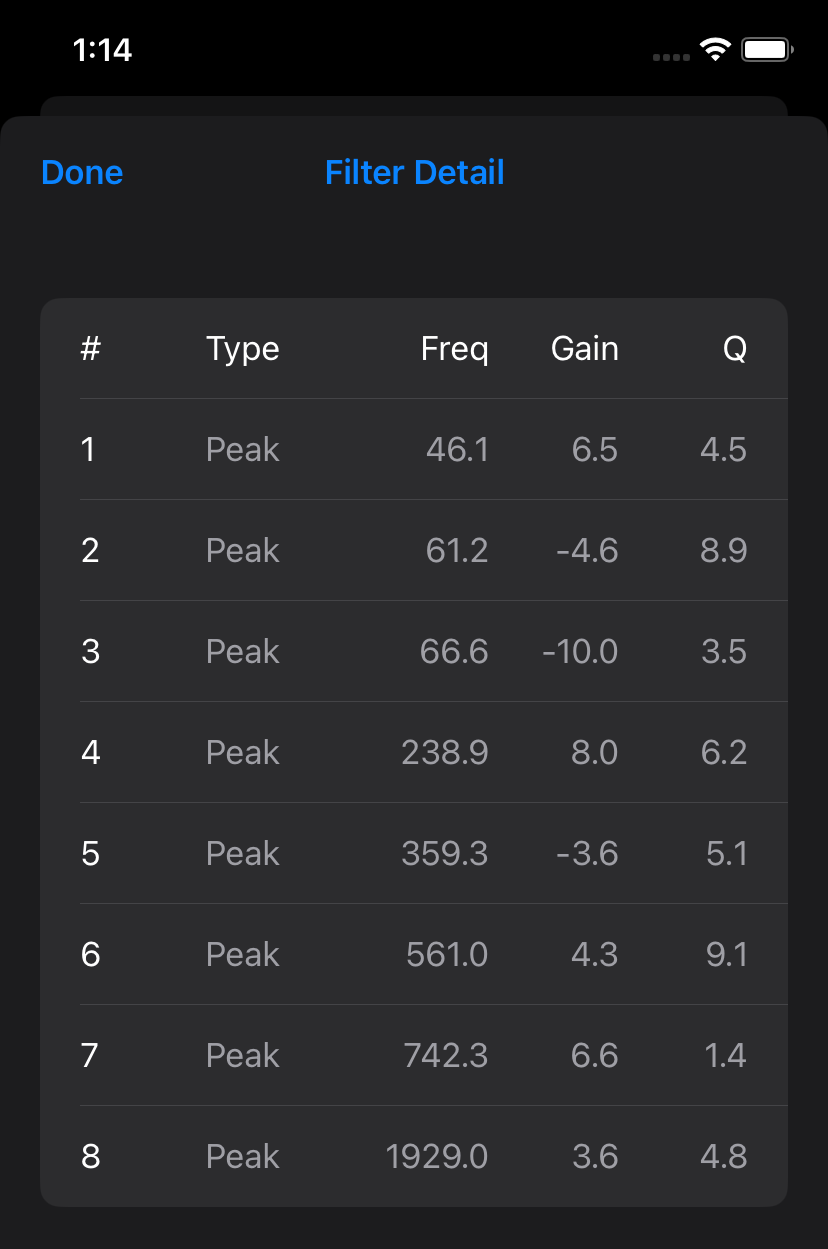
When filter type is PEQ, you can view the individual filters that make up the correction by tapping  . This will display the Filter Detail screen, shown below. This screen is handy if you need to manually enter the PEQ parameters into your audio system (PK = peak filter, HS = high shelf, LS = low shelf).
The filters can be exported to a file by tapping  . For more information see file formats.
With the filter(s) loaded into your audio system, you should find that measurements are reasonably close to the predicted response. The screenshots below show the predicted response (cyan) and actual measurements (green) after applying the filters.
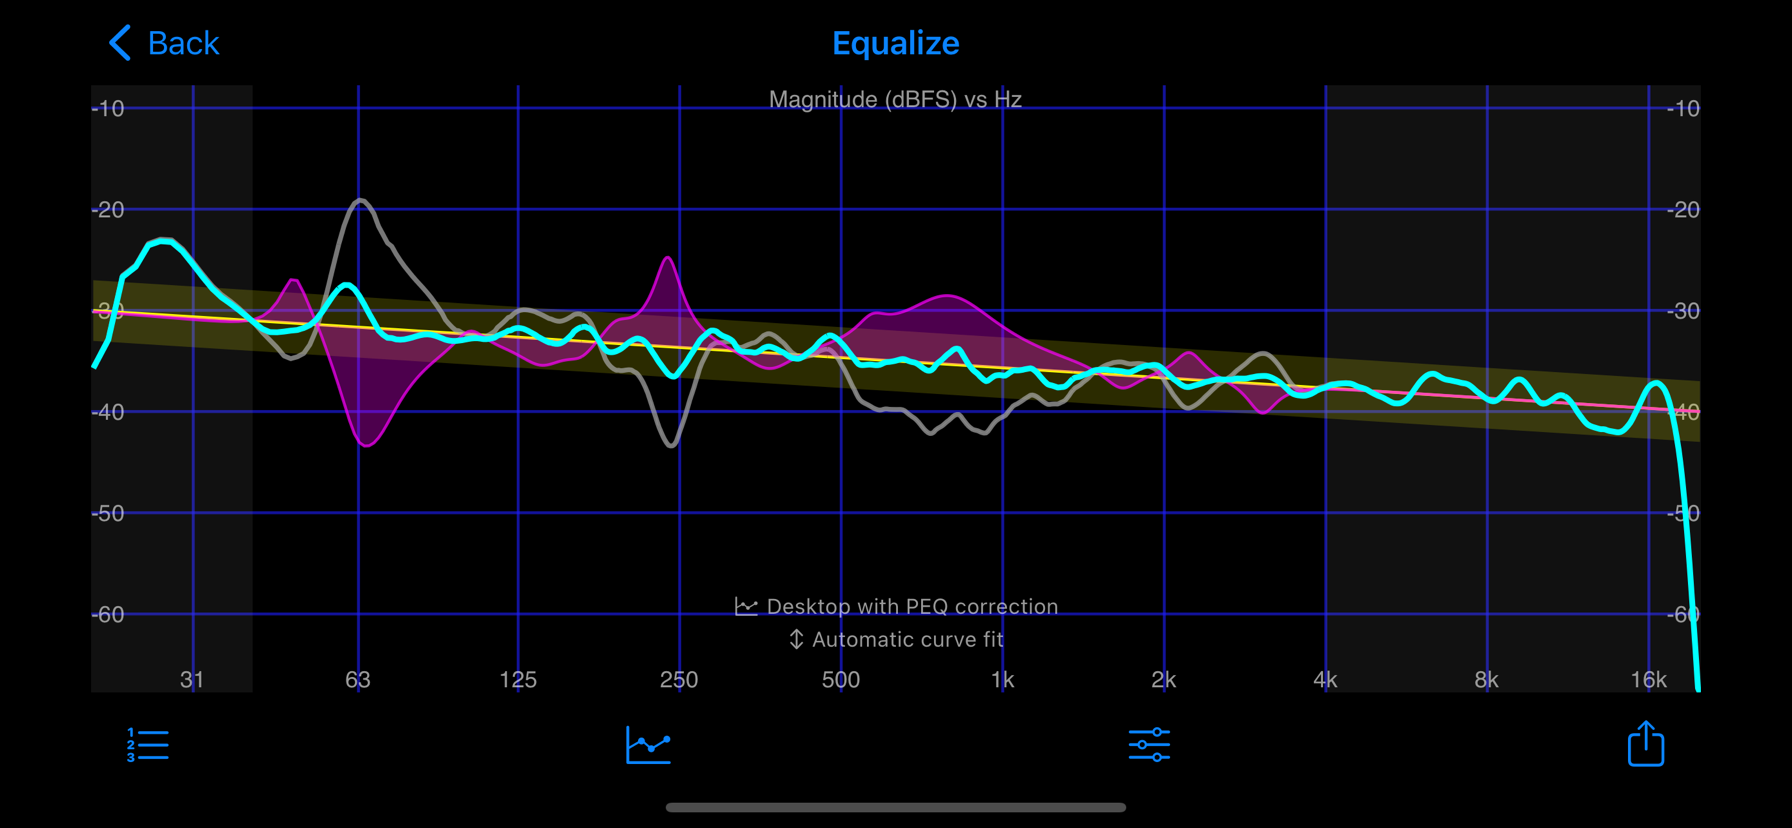
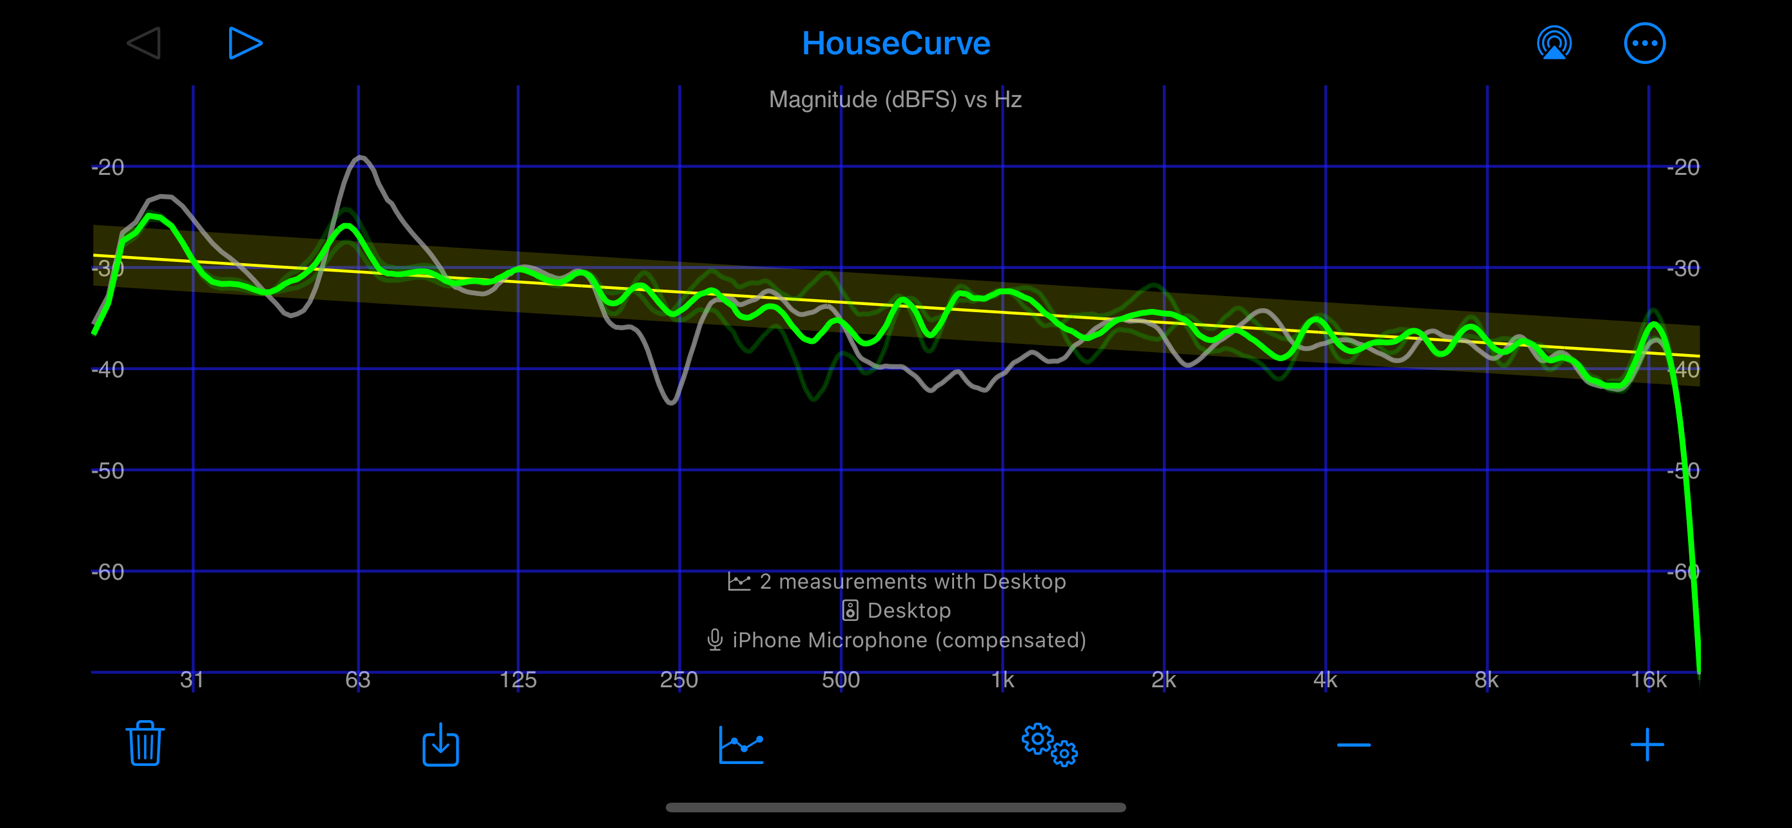
If your results are radically different from the prediction, check that the filter sample rate is correct - a mismatch will cause the filters to be applied to the wrong frequency. The file format may also be incompatible with your audio system. If you have questions or experience problems, please contact support.
The following application notes dive into the details of creating filters:
- Roon - FIR / PEQ impulse response
- miniDSP 2x4HD - biquad coefficients
- Volumio3 with FusionDSP - parametric EQ settings
In addition, HouseCurve’s filters have been tested on these systems:
- Crestron® DM NAX - PEQ direct upload
- HQPlayer - FIR / PEQ impulse response
- Equalizer APO - parametric EQ settings
- moOde Audio - FIR / PEQ impulse response
- HifiBerry DAC+DSP - parametric EQ settings
Manual Equalization
Equalization means changing the volume level at different frequencies. There are many ways an audio system can be changed to make this happen:
- Change speaker position in room
- Adjust the bass or treble controls
- Change relative levels of speakers (ex: subwoofer level)
- Adjust the graphic or parametric equalizer settings
- Change the room (ex: sound dampening, adjust furniture)
When equalizing, the goal is to adjust the audio system such that the average magnitude measurement ends up within the +/- 3 dB band that surrounds the target curve.
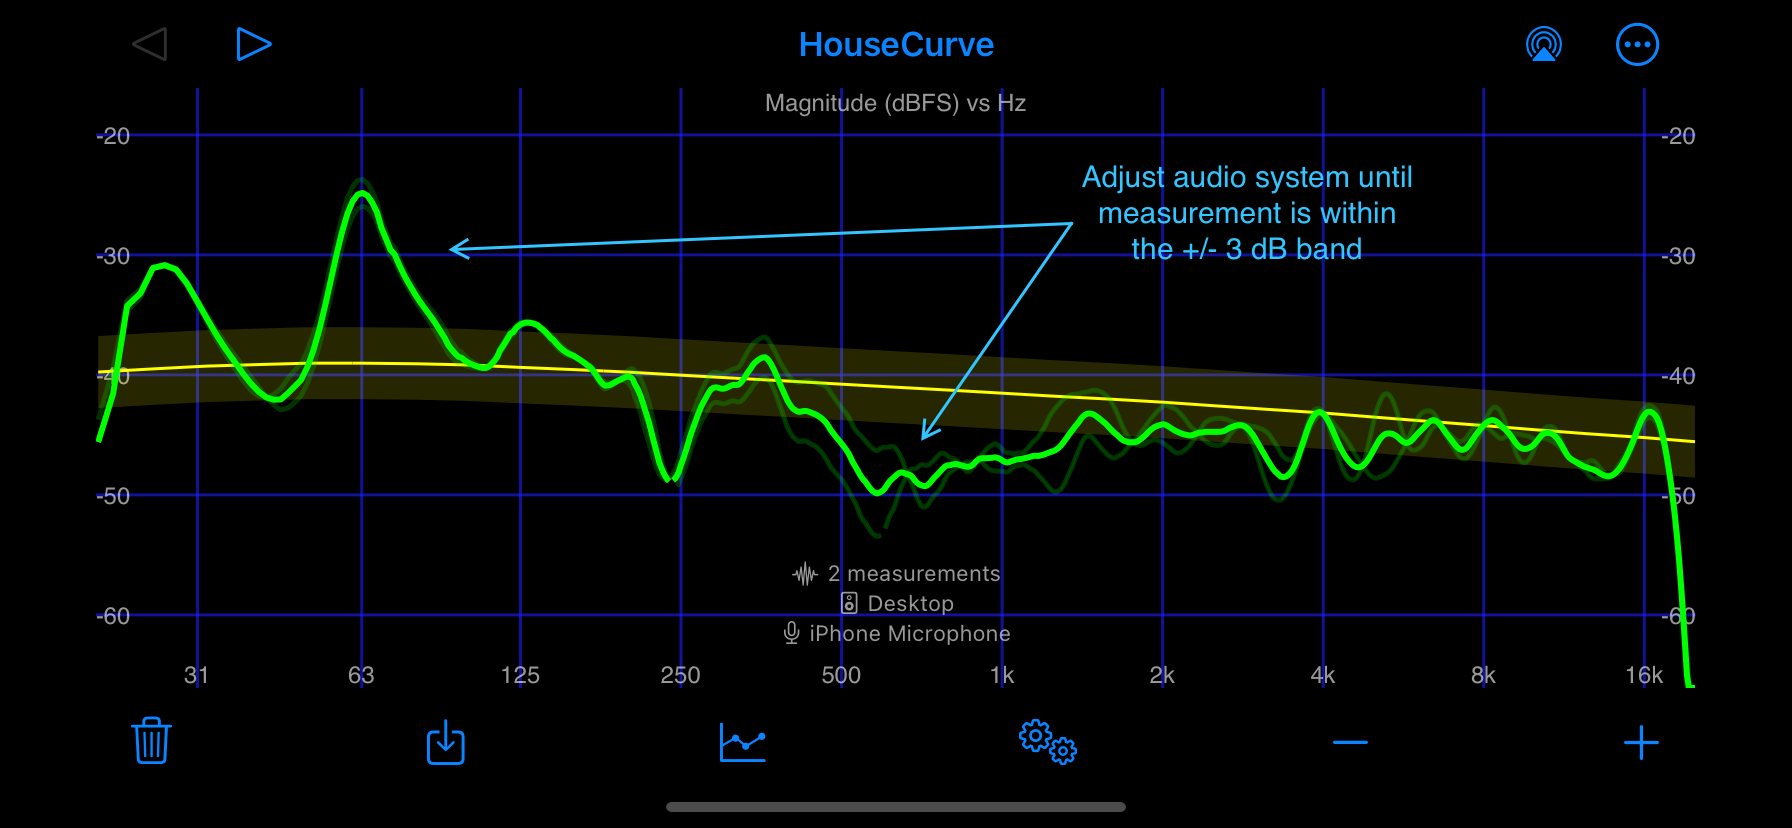
Adjust the audio system in small steps, collecting the same measurements after each change. Saved measurements are helpful for seeing the effect of an adjustment as can be seen below. You can also take a look at the Equalize Tool to see what HouseCurve would equalize (based on the saved measurement).
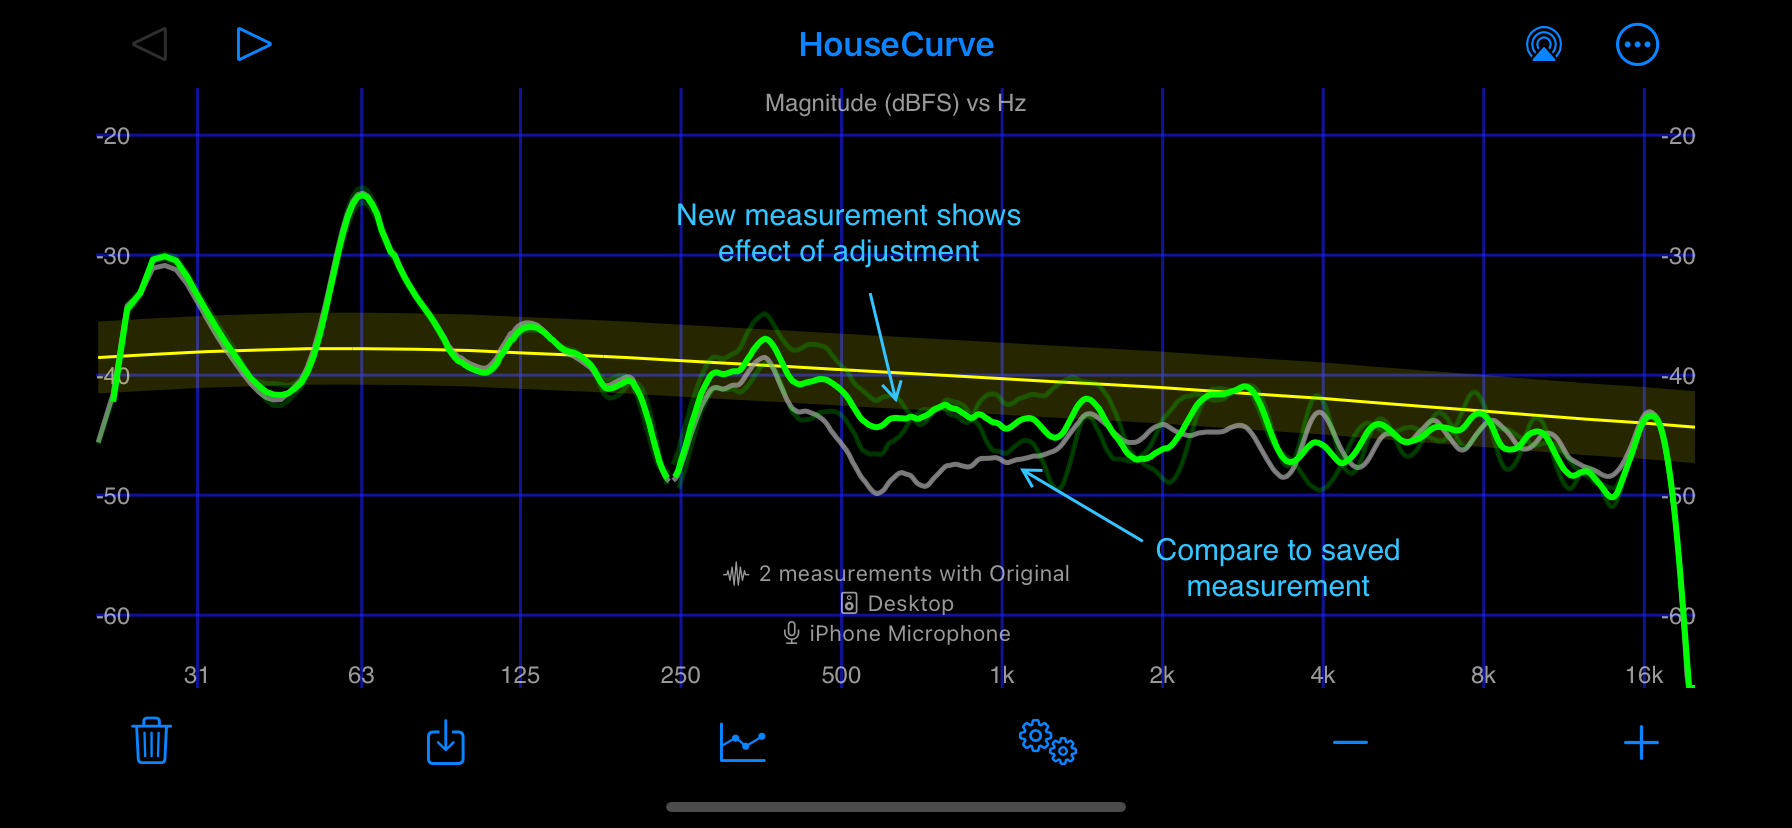
When most of the average magnitude measurement is within the target band, the audio system is sufficiently equalized. Further adjustments may not be perceptible.